搜索到
182
篇与
的结果
-
 PHP常见面试题 1. 问题:经常浏览那些技术性网站? v2ex,csdn2. 问题:写出五个与数组相关的函数。array_chunk 、array_unique、sort、array_column、array_merg3. 问题:“===”是什么?与“==”有什么区别?试举一个例子?=== 是全等 要求值和类型相等== 要求值相等,不判断类型4. 写出PHP序列化与JOSN相关的函数?如果要保存到数据库,你选择哪一种,为什么?JSON序列化和反序列化json_encode($arr)、json_encode($arr, true)json_encode($arr)5. 用过的PHP框架,博客/CMS系统,及商城系统有哪些?哪个最熟悉?用过的框架ThinkPHP5,cms:dedecms、fastadmin,商城:EcShop 6. MYSQL中常用的表类型(存储引擎)有哪些? Mysql存储引擎,myisam、innodb7. Composer是什么?PSR(PHP Standards Recommendations)是什么意识/大概包含什么内容?Composer是PHP包依赖管理工具 8. Session与Cookie的区别?如何设置一个严格30分钟过期的Session?Session严格30分钟过期1. 设置Cookie过期时间30分钟, 并设置Session的lifetime也为30分钟.2. 自己为每一个Session值增加Time stamp.3. 每次访问之前, 判断时间戳. 1,冒泡排序很实用要记得 functionmaopao($arr){ $len=count($arr); $n=count($arr)-1; for($i=0;$i<$len;$i++){ for($j=0;$j<$n;$j++){ if($arr[$j]<$arr[$j+1]){ $temp=$arr[$j+1]; $arr[$j+1] =$arr[$j]; $arr[$j] =$temp; } } } return $arr;}2,快速排序functionquick_sort($array) { if(count($array) <= 1)return $array; $key=$array[0]; $left_arr=array(); $right_arr=array(); for($i=1;$i<count($array);$i++){ if($array[$i] <=$key) $left_arr[] =$array[$i]; else $right_arr[] =$array[$i]; } $left_arr= quick_sort($left_arr); $right_arr= quick_sort($right_arr); return array_merge($left_arr,array($key),$right_arr); }
 -
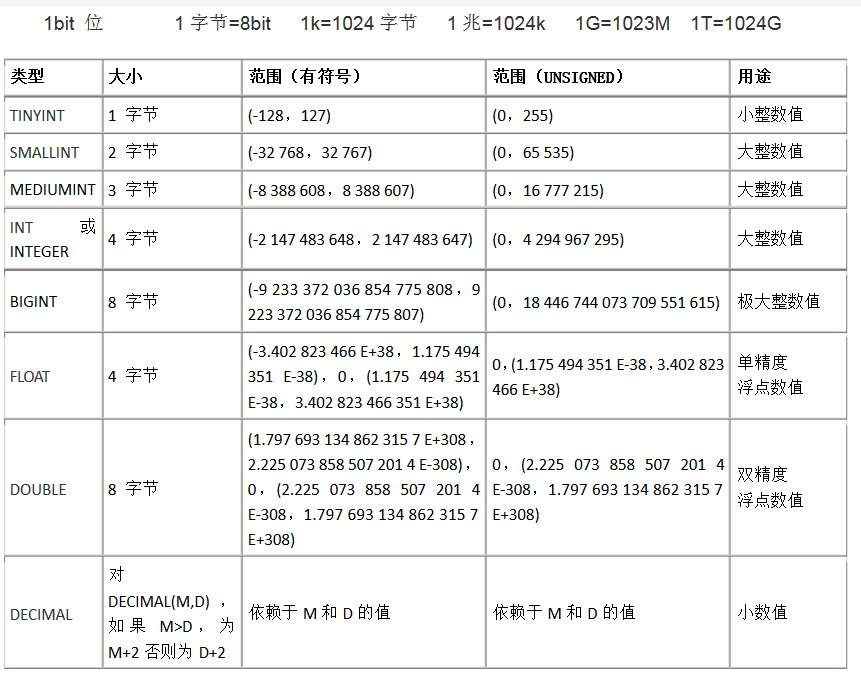
数据库表字段类型与合理的选择字段类型 字段类型数值MySQL 的数值数据类型可以大致划分为两个类别,一个是整数,另一个是浮点数或小数。许多不同的子类型对这些类别中的每一个都是可用的,每个子类型支持不同大小的数据,并且 MySQL 允许我们指定数值字段中的值是否有正负之分(UNSIGNED)或者用零填补(ZEROFILL)。INT在 MySQL 中支持的 5 个主要整数类型是 TINYINT,SMALLINT,MEDIUMINT,INT 和 BIGINT。这些类型在很大程度上是相同的,只有它们存储的值的大小是不相同的。MySQL 以一个可选的显示宽度指示器的形式对 SQL 标准进行扩展(如 INT(6),6即是其宽度指示器,该宽度指示器并不会影响int列存储字段的大小,也就是说,超过6位它不会自动截取,依然会存储,只有超过它本身的存储范围才会截取;此处宽度指示器的作用在于该字段是否有zerofill,如果有就未满足6位的部分就会用0来填充),这样当从数据库检索一个值时,可以把这个值加长到指定的长度。例如,指定一个字段的类型为 INT(6),就可以保证所包含数字少于 6 个的值从数据库中检索出来时能够自动地用空格填充。需要注意的是,使用一个宽度指示器不会影响字段的大小和它可以存储的值的范围。万一我们需要对一个字段存储一个超出许可范围的数字,MySQL 会根据允许范围最接近它的一端截短后再进行存储。还有一个比较特别的地方是,MySQL 会在不合规定的值插入表前自动修改为 0。unsigned 和 zerofillUNSIGNED 修饰符规定字段只保存正值,即无符号,而mysql字段默认是有符号的。因为不需要保存数字的正、负符号,可以在储时节约一个"位"的空间(即翻一倍)。从而增大这个字段可以存储的值的范围。注意这个修饰符要紧跟在数值类型后面;ZEROFILL 修饰符规定 0(不是空格)可以用来真补输出的值。使用这个修饰符可以阻止 MySQL 数据库存储负值,如果某列设置为zerofill,那它自动就unsigned。这个值要配合int,tinyint,smallint,midiumint等字段的宽度指示器来用;XXint(M),如果没有zerofill,这个M的宽度指示器是没有意义的.(注意,测试前导0的时候,还是去黑窗口测试;)为什么mysql存储的值要分有符号和无符号呢?因为一个字节,占8bit;也就1个bit有0和1两种可能,8个bit就是2^8 = 256种可能,也就是0~255;但如果是有符号的话,就得拿一个1bit来存储这个负号,本来8bit只剩7bit,2^7 = 128,也就是-128~127(正数部分包含一个0);FLOAT、DOUBLE 和 DECIMAL 类型MySQL 支持的三个浮点类型是 FLOAT、DOUBLE 和 DECIMAL 类型。FLOAT 数值类型用于表示单精度浮点数值,而 DOUBLE 数值类型用于表示双精度浮点数值。与整数一样,这些类型也带有附加参数:一个显示宽度指示器和一个小数点指示器(必须要带有指示器,要不然会查不到结果,并且宽度指示器和XXint类型的宽度指示器不同,这里是有实际限制宽度的)。比如语句 FLOAT(7,3) 规定显示的值不会超过 7 位数字(包括小数位),小数点后面带有 3 位数字。对于小数点后面的位数超过允许范围的值,MySQL 会自动将它四舍五入为最接近它的值,再插入它。DECIMAL 数据类型用于精度要求非常高的计算中,这种类型允许指定数值的精度和计数方法作为选择参数。精度在这里指为这个值保存的有效数字的总个数,而计数方法表示小数点后数字的位数。比如语句 DECIMAL(7,3) 规定了存储的值不会超过 7 位数字,并且小数点后不超过 3 位。FLOAT 类型在长度比较高比如 float(10,2)和 decimal(10,2)同时插入一个符合(10,2)宽度的数值,float 就会出现最后小数点出现一些出入;UNSIGNED 和 ZEROFILL 修饰符也可以被 FLOAT、DOUBLE 和 DECIMAL 数据类型使用。并且效果与 INT 数据类型相同。关于flaot和double在这里我建议,干脆忘记mysql有double这个数据类型。至于why?就不要管它了字符串类型MySQL 提供了 8 个基本的字符串类型,可以存储的范围从简单的一个字符到巨大的文本块或二进制字符串数据。BINARYBINARY不是函数,是类型转换运算符,它用来强制它后面的字符串为一个二进制字符串,可以理解为在字符串比较的时候区分大小写SELECT BINARY 'ABCD' = 'abcd' as COM1,'ABCD' = 'abcd' as COM2; -- COM1输出为0,COM2输出为1;CHAR 和 VARCHAR 类型CHAR 类型用于定长字符串,并且必须在圆括号内用一个大小修饰符来定义。这个大小修饰符的范围从 0-255。比指定长度大的值将被截短,而比指定长度小的值将会用空格作填补。CHAR 类型可以使用 BINARY 修饰符。当用于比较运算时,这个修饰符使 CHAR 以二进制方式参于运算,而不是以传统的区分大小写的方式。CHAR 类型的一个变体是 VARCHAR 类型。它是一种可变长度的字符串类型,并且也必须带有一个范围在 0-255 之间的指示器。CHAR 和 VARCHGAR 不同之处在于 MYSQL 数据库处理这个指示器的方式:CHAR 把这个大小视为值的大小,不长度不足的情况下就用空格补足。而 VARCHAR 类型把它视为最大值并且只使用存储字符串实际需要的长度(增加一个额外字节来存储字符串本身的长度)来存储值。所以短于指示器长度的 VARCHAR 类型不会被空格填补,但长于指示器的值仍然会被截短。因为 VARCHAR 类型可以根据实际内容动态改变存储值的长度,所以在不能确定字段需要多少字符时使用 VARCHAR 类型可以大大地节约磁盘空间、提高存储效率。但如果确切知道字符串长度,比如就在50~55之间,那就用 CHAR 因为 CHAR 类型由于本身定长的特性使其性能要高于 VARCHAR;VARCHAR 类型在使用 BINARY 修饰符时与 CHAR 类型完全相同。TEXT 和 BLOB 类型对于字段长度要求超过 255 个的情况下,MySQL 提供了 TEXT 和 BLOB 两种类型。根据存储数据的大小,它们都有不同的子类型。这些大型的数据用于存储文本块或图像、声音文件等二进制数据类型。TEXT 和 BLOB 类型在分类和比较上存在区别。BLOB 类型区分大小写,而 TEXT 不区分大小写。大小修饰符不用于各种 BLOB 和 TEXT 子类型。比指定类型支持的最大范围大的值将被自动截短。时间类型在处理日期和时间类型的值时,MySQL 带有 5 个不同的数据类型可供选择。DATE、TIME 和 YEAR 类型MySQL 用 DATE 和 YEAR 类型存储简单的日期值,使用 TIME 类型存储时间值。这些类型可以描述为字符串或不带分隔符的整数序列。如果描述为字符串,DATE 类型的值应该使用连字号作为分隔符分开,而 TIME 类型的值应该使用冒号作为分隔符分开。需要注意的是,没有冒号分隔符的 TIME 类型值,将会被 MySQL 理解为持续的时间,而不是时间戳。MySQL 还对日期的年份中的两个数字的值,或是 SQL 语句中为 YEAR 类型输入的两个数字进行最大限度的通译。因为所有 YEAR 类型的值必须用 4 个数字存储。MySQL 试图将 2 个数字的年份转换为 4 个数字的值。把在 00-69 范围内的值转换到 2000-2069 范围内。把 70-99 范围内的值转换到 1970-1979 之内。如果 MySQL 自动转换后的值并不符合我们的需要,请输入 4 个数字表示的年份。DATETIME 和 TIMESTAMP 类型除了日期和时间数据类型,MySQL 还支持 DATETIME 和 TIMESTAMP 这两种混合类型。它们可以把日期和时间作为单个的值进行存储。这两种类型通常用于自动存储包含当前日期和时间的时间戳,并可在需要执行大量数据库事务和需要建立一个调试和审查用途的审计跟踪的应用程序中发挥良好作用。如果我们对 TIMESTAMP 类型的字段没有明确赋值,或是被赋与了 null 值。MySQL 会自动使用系统当前的日期和时间来填充它。复合类型MySQL 还支持两种复合数据类型 ENUM 和 SET,它们扩展了 SQL 规范。虽然这些类型在技术上是字符串类型,但是可以被视为不同的数据类型。一个 ENUM 类型只允许从一个集合中取得一个值;而 SET 类型允许从一个集合中取得任意多个值。ENUM 类型ENUM 类型因为只允许在集合中取得一个值,有点类似于单选项。在处理相互排拆的数据时容易让人理解,比如人类的性别。ENUM 类型字段可以从集合中取得一个值或使用 null 值,除此之外的输入将会使 MySQL 在这个字段中插入一个空字符串。另外如果插入值的大小写与集合中值的大小写不匹配,MySQL 会自动使用插入值的大小写转换成与集合中大小写一致的值。ENUM 类型在系统内部可以存储为数字,并且从 1 开始用数字做索引。一个 ENUM 类型最多可以包含 65536 个元素,其中一个元素被 MySQL 保留,用来存储错误信息,这个错误值用索引 0 或者一个空字符串表示。MySQL 认为 ENUM 类型集合中出现的值是合法输入,除此之外其它任何输入都将失败。这说明通过搜索包含空字符串或对应数字索引为 0 的行就可以很容易地找到错误记录的位置。SET 类型SET 类型与 ENUM 类型相似但不相同。SET 类型可以从预定义的集合中取得任意数量的值。并且与 ENUM 类型相同的是任何试图在 SET 类型字段中插入非预定义的值都会使 MySQL 插入一个空字符串。如果插入一个即有合法的元素又有非法的元素的记录,MySQL 将会保留合法的元素,除去非法的元素。一个 SET 类型最多可以包含 64 项元素。还去除了重复的元素,所以 SET 类型中不可能包含两个相同的元素。希望从 SET 类型字段中找出非法的记录只需查找包含空字符串或二进制值为 0 的行。字段类型总结虽然上面列出了很多字段类型,但最常用也就是 varchar(255),char(255),text,tinyint(4),smallint(6),mediumint,int(11)几种。复合类型我们一般用tinyint,更快的时间更省的空间以及更容易扩展关于手机号,推荐用char(11),char(11)在查询上更有效率,因为手机号是一个活跃字段参与逻辑会很多。一些常用字段举例姓名:char(20)价格:DECIMAL(7, 3)产品序列号:SMALLINT(5) unsigned文章内容: TEXTMD5: CHAR(32)ip: char(15)time: int(10)email char(32)合理的选择数据类型选择合理范围内最小的我们应该选择最小的数据范围,因为这样可以大大减少磁盘空间及磁盘I/0读写开销,减少内存占用,减少CPU的占用率。选择相对简单的数据类型数字类型相对字符串类型要简单的多,尤其是在比较运算时,所以我们应该选择最简单的数据类型,比如说在保存时间时,因为PHP可以良好的处理LINUX时间戳所以我们可以将日期存为int(10)要方便、合适、快速的多。但是,工作中随着项目越做越多,业务逻辑的处理越来越难以后,我发现时间类型还是用时间类型本身的字段类型要好一些,因为mysql有着丰富的时间函数供我使用,方便我完成很多与时间相关的逻辑,比如月排行榜,周排行榜,当日热门,生日多少天等等逻辑不要使用null为什么这么说呢,因为MYSQL对NULL字段索引优化不佳,增加更多的计算难度,同时在保存与处理NULL类形时,也会做更多的工作,所以从效率上来说,不建议用过多的NULL。有些值他确实有可能没有值,怎么办呢?解决方法是数值弄用整数0,字符串用空来定义默认值即可。字符串类型的使用字符串数据类型是一个万能数据类型,可以储存数值、字符串、日期等。保存数值类型最好不要用字符串数据类型,这样存储的空间显然是会更大,而且在排序时字符串的9是大于22的,其实如果进行运算时mysql会将字符串转换为数值类型,大大降低效果,而且这种转换是不会走原有的索引的。如果明确数据在一个完整的集合中如男,女,那么可以使用set或enum数据类型,这种数据类型在运算及储存时以数值方式操作,所以效率要比字符串更好,同时空间占用更少。VARCHAR与CHARVARCHAR是可变长度字符串类型,那么即然长度是可变的就会使用1,2个字节来保存字符的长度,如果长度在255内使用1个字节来保存字符长度,否则使用2个字符来保存长度。由于varchar是根据储存的值来保存数据,所以可以大大节约磁盘空间。如果数据经常被执行更新操作,由于VARCHAR是根据内容来进行储存的,所以mysql将做更多的工作来完成更新操作,如果新数据长度大于老数据长度一些存储引擎会进行拆分操作处理。同时varchar会完全保留内部所有数据,最典型的说明就是尾部的空格。CHAR固定长度的字符串保存类型,CHAR会去掉尾部的空格。在数据长度相近时使用char类型比较合适,比如md5加密的密码用户名等。如果数据经常进行更新修改操作,那么CHAR更好些,因为char长度固定,性能上要快。数值类型的选择数值数据类型要比字符串执行更快,区间小的数据类型占用空间更少,处理速度更快,如tinyint可比bigint要快的多选择数据类型时要考虑内容长度,比如是保存毫米单位还是米而选择不同的数值类型整数整数类型很多比如tinyint、int、smallint、bigint等,那么我们要根据自己需要存储的数据长度决定使用的类型,同时tinyint(10)与tinyint(100)在储存与计算上并无任何差别,区别只是显示层面上,但是我们也要选择适合合适的数据类型长度。可以通过指定zerofill属性查看显示时区别。浮点数与精度数值浮点数float在储存空间及运行效率上要优于精度数值类型decimal,但float与double会有舍入错误而decimal则可以提供更加准确的小数级精确运算不会有错误产生计算更精确,适用于金融类型数据的存储。
-
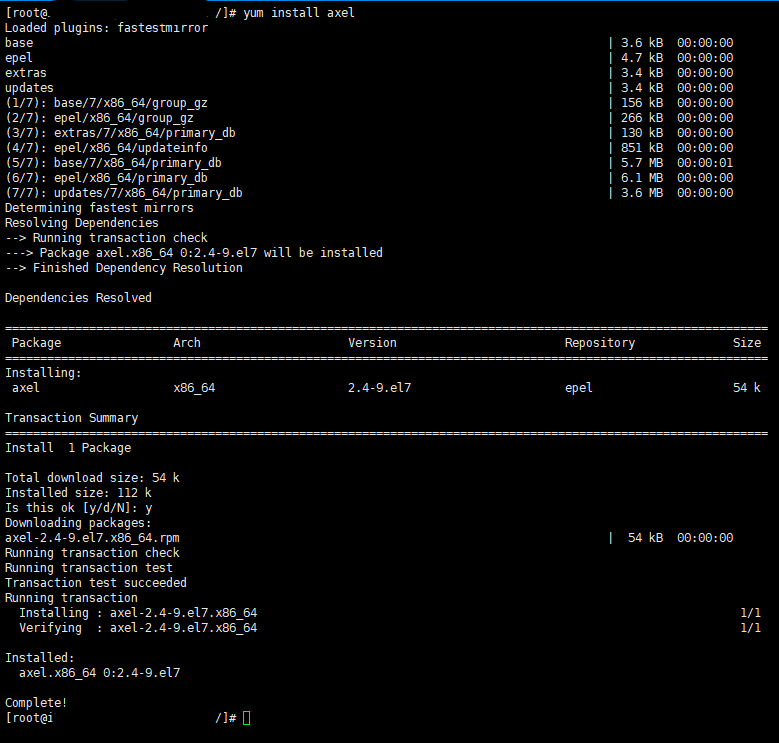
centos7搭建lnmp开发环境 centos7搭建lnmp开发环境一、安装axel1. 在shell中运行 yum install axel进行安装用yum安装如果没有的话需要安装EPEL源(Extra Packages for Enterprise Linux),为“红帽系”的操作系统提供额外的软件包,适用于RHEL、CentOS等,里面有1万多个软件安装 epel-releasewget https://mirrors.ustc.edu.cn/epel//7/x86\_64/Packages/e/epel-release-7-11.noarch.rpm rpm -ivh epel-release-7-11.noarch.rpm##更新yum源yum clean all yum update2. 安装后可以用axel --version查看版本。检测是否安装成功。二、安装nginx1. 安装依赖包nginx依赖ssl,rewrite,gzip 3个包,如果没有c++编译环境需要用下面命令安装。yum install gcc-c++2. 建立目录先在home目录下建一个nginx文件夹。然后进入文件。(nginx、openssl、zlib、pcre直接下载到这个文件夹,解压也是解压到这个文件夹,都安装好后直接删除即可。)cd home mkdir nginx cd nginx3. openssl库安装ssl功能需要安装openssl库 ,官网:https://www.openssl.org。建立文件夹/alidata/library/做为这3个库的安装目录。统一放一个文件夹,日后如果想卸载,直接删除就可以。在library下面再建立openssl、zlib、pcre三个文件夹。做为那3个库的安装目录。参考:https://blacksaildivision.com/how-to-install-openssl-on-centoswget https://www.openssl.org/source/openssl-1.1.1a.tar.gz yum install libtool perl-core zlib-devel -y #安装响应的组件 tar -zxvf openssl-1.1.1a.tar.gz cd openssl-1.1.1a ./config --prefix=/usr/local/openssl --openssldir=/usr/local/openssl shared zlib make && make install vi /etc/profile.d/openssl.sh # /etc/profile.d/openssl.sh pathmunge /usr/local/openssl/bin vi /etc/ld.so.conf.d/openssl-1.1.0g.conf # /etc/ld.so/conf.d/openssl-1.1.0g.conf /usr/local/openssl/lib #执行命令使openssl新版本lib路径生效 ldconfig -v #重开shell4. 安装zlib库gzip模块需要安装zlib库,官网:http://www.zlib.net。(axel -n 后面的10是一次性建立10个连接下载)axel -n 10 http://www.zlib.net/zlib-1.2.11.tar.gz tar -zxvf zlib-1.2.11.tar.gz cd zlib-1.2.11 ./configure --prefix=/alidata/library/zlib && make && make install5. 安装pcre库rewrite模块需要pcre库,官网:http://www.pcre.org。axel -n 10 https://ftp.pcre.org/pub/pcre/pcre-8.41.tar.gz tar -zxvf pcre-8.41.tar.gz cd pcre-8.41 ./configure --prefix=/alidata/library/pcre && make && make install6. nginx的编译安装下载nginx,nginx的官网是http://nginx.org/。我们直接下载最新版本的nginx-1.14.2。在/alidata下建立server,然后在server下面分别建立nginx、mysql、php。后面会分别把对应的软件安装到这几个文件夹里。(--prefix:nginx的安装目录 ,--with-pcre:pcre的源码目录,--with-zlib和--with-openssl同理)axel -n 10 http://nginx.org/download/nginx-1.14.2.tar.gz tar -zxvf nginx-1.14.2.tar.gz cd nginx-1.14.2 ./configure \ --prefix=/alidata/server/nginx \ --with-http_realip_module \ --with-http_sub_module \ --with-http_flv_module \ --with-http_dav_module \ --with-http_gzip_static_module \ --with-http_stub_status_module \ --with-http_addition_module \ --with-pcre=/home/nginx/pcre-8.41 \ --with-openssl=/home/nginx/openssl-1.1.1a \ --with-openssl-opt='enable-tls1_3 enable-weak-ssl-ciphers' \ --with-http_ssl_module \ --with-http_v2_module \ --with-zlib=/home/nginx/zlib-1.2.11 && make && make install7. 检查nginx是否安装成功检查nginx是否安装成功,如果出现下图信息,表示安装成功。cd /alidata/server/nginx/sbin ./nginx -t8. 常用命令nginx的几个常用命令:查看Nginx的版本号:./nginx -v启动Nginx:./nginx快速停止或关闭Nginx:./nginx -s stop正常停止或关闭Nginx:./nginx -s quit配置文件修改重装载命令:./nginx -s reload9. 将nginx加入系统命令vi /etc/init.d/nginx加入下面代码#!/bin/bash #nginx Startup script for the Nginx HTTP Server # it is v.0.0.2 version. # chkconfig: - 85 15 # description: Nginx is a high-performance web and proxy server. # It has a lot of features, but it's not for everyone. # processname: nginx # pidfile: /var/run/nginx.pid # config: /usr/local/nginx/conf/nginx.conf nginxd=/alidata/server/nginx/sbin/nginx nginx_config=/alidata/server/nginx/conf/nginx.conf nginx_pid=/alidata/server/nginx/run/nginx.pid RETVAL=0 prog="nginx" # Source function library. . /etc/rc.d/init.d/functions # Source networking configuration. . /etc/sysconfig/network # Check that networking is up. [ [${NETWORKING} = "no"] ] && exit 0 [ -x $nginxd ] || exit 0 # Start nginx daemons functions. start() { if [ -e $nginx_pid ];then echo "nginx already running...." exit 1 fi echo -n $"Starting $prog: " daemon $nginxd -c ${nginx_config} RETVAL=$? echo [ $RETVAL = 0 ] && touch /var/lock/subsys/nginx return $RETVAL } # Stop nginx daemons functions. stop() { echo -n $"Stopping $prog: " killproc $nginxd RETVAL=$? echo [ $RETVAL = 0 ] && rm -f /var/lock/subsys/nginx /alidata/server/nginx/run/nginx.pid } # reload nginx service functions. reload() { echo -n $"Reloading $prog: " #kill -HUP `cat ${nginx_pid}` killproc $nginxd -HUP RETVAL=$? echo } # See how we were called. case "$1" in start) start ;; stop) stop ;; reload) reload ;; restart) stop start ;; status) status $prog RETVAL=$? ;; *) echo $"Usage: $prog {start|stop|restart|reload|status|help}" exit 1 esac exit $RETVAL保存上面的代码。然后添加到系统服务中。chmod 755 /etc/init.d/nginx chkconfig --add nginx10. 在系统服务目录中创建nginx.service文件vi /lib/systemd/system/nginx.service加入下面的代码[Unit] Description=nginx After=network.target [Service] Type=forking ExecStart=/alidata/server/nginx/sbin/nginx ExecReload=/alidata/server/nginx/sbin/nginx -s reload ExecStop=/alidata/server/nginx/sbin/nginx -s quit PrivateTmp=true [Install] WantedBy=multi-user.target保存。再执行重加载systemctl daemon-reload设置开机启动systemctl enable nginx.service10. nginx服务命令配置好之后nginx就可以用系统服务的方式操作了。service nginx start 启动nginxservice nginx stop 关闭nginxservice nginx restart 重启nginxservice nginx reload 重新加载nginx三、安装php1. 下载php安装包新建一个文件夹/home/php文件夹存放php的安装文件。php的官网:http://www.php.net/下载php的最新版本php-7.3.1axel -n 10 http://cn2.php.net/distributions/php-7.3.1.tar.gz2. 解压压缩包tar -zxvf php-7.3.1.tar.gz cd php-7.3.13. 安装依赖库先安装php需要的依赖库(直接复制进去一次性安装好)yum -y install libxml2 yum -y install libxml2-devel yum -y install openssl yum -y install openssl-devel yum -y install curl-devel yum -y install libjpeg-devel yum -y install libpng-devel yum -y install freetype-devel yum -y install bzip2-devel yum -y install libmcrypt libmcrypt-devel yum -y install postgresql-devel yum -y install aspell-devel yum -y install readline-devel yum -y install libxslt-devel yum -y install net-snmp-devel yum -y install unixODBC-devel yum -y install libicu-devel yum -y install libc-client-devel yum -y install libXpm-devel yum -y install libvpx-devel yum -y install enchant-devel yum -y install openldap yum -y install openldap-devel yum -y install db4-devel yum -y install gmp-devel yum -y install sqlite-devel yum -y install mysql-devel如果cmake版本低于3.0.2需要升级wget https://cmake.org/files/v3.13/cmake-3.13.0.tar.gz tar -zxvf cmake-3.13.0.tar.gz cd cmake-3.13.0 ./bootstrap --prefix=/usr/ make && make install cmake --versionlibzip安装wget https://libzip.org/download/libzip-1.5.1.tar.gz tar -zxvf libzip-1.5.1.tar.gz cd libzip-1.5.1 mkdir build && cd build && cmake .. && make && make install echo '/usr/local/lib64 /usr/local/lib /usr/lib /usr/lib64'>>/etc/ld.so.conf&&ldconfig -v4. 添加用户和组groupadd -r www && adduser -r -g www -s /bin/false -d /alidata/www -M www查看用户cat /etc/passwd查看组cat /etc/group5. 对php7进行配置下面代码按需求修改后全部复制进去一次性执行(php7.3去掉 --with-mcrypt, --enable-gd-native-ttf, --with-libmbfl)./configure \ --prefix=/alidata/server/php \ --with-config-file-path=/alidata/server/php/etc \ --enable-fpm \ --with-fpm-user=www \ --with-fpm-group=www \ --enable-inline-optimization \ --disable-debug \ --disable-rpath \ --enable-shared \ --enable-soap \ --with-xmlrpc \ --with-openssl \ --with-pcre-regex \ --with-sqlite3 \ --with-zlib \ --enable-bcmath \ --with-iconv \ --with-bz2 \ --enable-calendar \ --with-curl \ --with-cdb \ --enable-dom \ --enable-exif \ --enable-fileinfo \ --enable-filter \ --with-pcre-dir \ --enable-ftp \ --with-gd \ --with-openssl-dir \ --with-jpeg-dir \ --with-png-dir \ --with-freetype-dir \ --with-gettext \ --with-gmp \ --with-mhash \ --enable-json \ --enable-mbstring \ --enable-mbregex \ --enable-mbregex-backtrack \ --with-onig \ --enable-pdo \ --with-mysqli=mysqlnd \ --with-pdo-mysql=mysqlnd \ --with-zlib-dir \ --with-pdo-sqlite \ --with-readline \ --enable-session \ --enable-shmop \ --enable-simplexml \ --enable-sockets \ --enable-sysvmsg \ --enable-sysvsem \ --enable-sysvshm \ --enable-wddx \ --with-libxml-dir \ --with-xsl \ --enable-zip \ --enable-mysqlnd-compression-support \ --with-pear \ --enable-opcache \ --enable-pcntl \ --enable-posix6. 编译安装php7make && make install看到下图信息说明安装成功 (如果重新编译需要先make clean清理之前的已经编译的可执行文件)7. 查看php版本/alidata/server/php/bin/php -v8. 创建配置文件创建www.conf配置文件cd /alidata/server/php/etc/php-fpm.d cp www.conf.default www.conf创建php-fpm.conf配置文件cd /alidata/server/php/etc cp php-fpm.conf.default php-fpm.conf创建php.ini配置文件将安装源文件目录里的php.ini-production或者php.ini-development修改后缀拷贝到php安装目录的etc文件夹内cd /home/php/php-7.3.1 cp php.ini-production /alidata/server/php/etc/php.ini9. 将bin和sbin路径加入到path变量中。配置环境变量vim /etc/profile加入下面内容PATH=/user/local/cmake/bin:$PATH PATH=/alidata/server/mysql/bin:$PATH PATH=/alidata/server/php/bin:$PATH export PATH保存后执行source命令使配置立即生效source /etc/profile10. 配置php-fpm到系统服务cp /home/php/php-7.3.1/sapi/fpm/init.d.php-fpm /etc/init.d/php-fpm chmod 755 /etc/init.d/php-fpm配置php-fpm.confvim /alidata/server/php/etc/php-fpm.conf将pid(;pid = run/php-fpm.pid)前的;去掉。12. 配置开机自动启动chkconfig --add /etc/init.d/php-fpm chkconfig php-fpm on13. 配置nginx解析php文件cd /alidata/server/nginx/conf vim nginx.conf将php解析前的#都去掉,如下图。然后保存修改。 location ~ .*\.(php|php5)?$ { fastcgi_pass 127.0.0.1:9000; fastcgi_index index.php; include fastcgi.conf; }nginx重新加载配置文件service nginx reload14. 创建一个php文件如果设置了根目录,在根目录里面新建vi /alidata/server/nginx/html/phpinfo.php输入如下代码<?php phpinfo(); ?>保存配置没问题就会看到下面的页面四、安装mysq1. 下载mysql下载mysql,官网地址:https://www.mysql.com/axel -n 10 https://cdn.mysql.com//Downloads/MySQL-8.0/mysql-8.0.13.tar.gzyum localinstall https://repo.mysql.com//mysql80-community-release-el7-2.noarch.rpmyum -c /etc/yum.conf --installroot=/alidata/server/mysql -y install mysql-community-server2. 解压压缩包tar -zxvf mysql-8.0.13.tar.gz3. 安装编译需要的软件包yum -y install make bison-devel ncurses-devel libaio libaio-devel perl-Data-Dumper net-tools4. 编译配置重新cmake需要删除CMakeCache.txt文件cd mysql-8.0.13 cmake . \ -DCMAKE_INSTALL_PREFIX=/alidata/server/mysql \ -DMYSQL_DATADIR=/alidata/server/mysql/data \ -DSYSCONFDIR=/etc \ -DWITH_MYISAM_STORAGE_ENGINE=1 \ -DWITH_INNOBASE_STORAGE_ENGINE=1 \ -DWITH_MEMORY_STORAGE_ENGINE=1 \ -DWITH_READLINE=1 \ -DMYSQL_UNIX_ADDR=/var/lib/mysql/mysql.sock \ -DMYSQL_TCP_PORT=3306 \ -DENABLED_LOCAL_INFILE=1 \ -DWITH_PARTITION_STORAGE_ENGINE=1 \ -DEXTRA_CHARSETS=all \ -DDEFAULT_CHARSET=utf8 \ -DDEFAULT_COLLATION=utf8_general_ci \ -DDOWNLOAD_BOOST=1 \ -DWITH_BOOST=/alidata/server/boost(注:如果boost已经安装过在配置里面去掉-DDOWNLOAD_BOOST=1,这个配置是用来下载boost。另外配置boost的安装目录 -DWITH_BOOST。其他的按需要配置即可。)5. 编译安装make && make install6. 创建mysql用户和组groupadd -r mysql && adduser -r -g mysql -s /bin/false -M mysql7. 修改mysql的权限chown -R mysql:mysql /alidata/server/mysql8. 数据库初始化cd /alidata/server/mysql/bin ./mysqld --initialize --basedir=/alidata/server/mysql --datadir=/alidata/server/mysql/data --user=mysql9. 加入到系统服务cp /alidata/server/mysql/support-files/mysql.server /etc/init.d/mysql chmod 755 /etc/init.d/mysql chkconfig --add mysql10. 配置my.cnfvim /etc/my.cnf修改对应的配置[mysqld] datadir=/alidata/server/mysql/data socket=/var/lib/mysql/mysql.sock # Disabling symbolic-links is recommended to prevent assorted security risks symbolic-links=0 # Settings user and group are ignored when systemd is used. # If you need to run mysqld under a different user or group, # customize your systemd unit file for mariadb according to the # instructions in http://fedoraproject.org/wiki/Systemd [mysqld_safe] log-error=/alidata/server/mysql/log/mariadb.log pid-file=/alidata/server/mysql/log/run/mariadb.pid # # include all files from the config directory # !includedir /etc/my.cnf.d保存文件后建立mysql.sock的存放目录,并分配给mysql用户和组mkdir /var/lib/mysql chown -R mysql:mysql /var/lib/mysql创建日志文件mariadb.logtouch /alidata/server/mysql/log/mariadb.log cd /alidata/server/mysql/log chown -R mysql:mysql mariadb.log11. 启动mysqlservice mysql start如果启动有问题可以查看mariadb.log日志里面的[ERROR]部分。12. 修改初始密码,mysql登录查看mysql的初始密码???用初始密码登录mysql???cd /alidata/server/mysql/bin ./mysql -uroot -p登录后修改密码alter user user() identified by "你的新密码";修改用户的MySQL的密码认证插件是“mysql_native_password”alter user 'root'@'localhost' identified with mysql_native_password by '密码'; flush privileges;查询用户的密码插件信息use mysql select plugin,authentication_string,host,user from user;允许远程访问my.cnf添加下面参数重启数据库 default_authentication_plugin=mysql_native_password 创建用户 create user 'root'@'%' identified by 'mysql的密码'; grant all on *.* to 'root'@'%'; flush privileges;13. 配置环境变量vim /etc/profile加入下面内容export PATH=$JAVA_HOME/bin:$PATH:/alidata/server/php/bin:/alidata/server/php/sbin:/alidata/server/mysql/bin保存后执行source命令使配置立即生效source /etc/profile到这为止,lnmp的环境就配置完成了。五、安装redis下载redisaxel -n 10 http://download.redis.io/releases/redis-5.0.3.tar.gz tar -zxvf redis-5.0.3.tar.gz cd redis-5.0.3安装redismake PREFIX=/alidata/server/redis/ install配置redis新建数据目录和日志目录mkdir /alidata/server/redis/data mkdir /alidata/server/redis/log cp ./redis.conf /alidata/server/redis/ vim /alidata/server/redis/redis.conf编辑内容# IP绑定 bind 127.0.0.1 192.168.0.111 # 保护模式(开启条件为各redis之间可以互相通信,做集群不可开启) protected-mode yes # 访问端口 port 6379 # 连接超时,单位S,0为不启用超时 timeout 0 # 以守护进程运行 daemonize yes # 数据文件路径 dir /alidata/server/redis/data # 进程ID文件的路径 pidfile /alidata/server/redis/log/redis.pid # 日志文件路径 logfile /alidata/server/redis/log/redis.log # 设置登陆密码 requirepass [redis的密码] # 禁用部分危险命令 rename-command FLUSHALL "" rename-command CONFIG "" rename-command EVAL "" # 开启键过期删除通知 notify-keyspace-events Ex性能优化# 编辑/etc/rc.local vim /etc/rc.local echo never > /sys/kernel/mm/transparent_hugepage/enabled # 添加/etc/rc.local执行权限 chmod +x /etc/rc.d/rc.local # 编辑/etc/sysctl.conf vim /etc/sysctl.conf vm.overcommit_memory = 1 net.core.somaxconn = 1024 # 立即解决 echo never > /sys/kernel/mm/transparent_hugepage/enabled echo 1024 > /proc/sys/net/core/somaxconn sysctl vm.overcommit_memory=1 sysctl -p修改目录归属useradd -s /sbin/nologin -M redis chown -R redis:redis /alidata/server/redis启动redis并设置开机启动# 进入单元文件目录 cd /etc/systemd/system # 创建redis单元文件,格式为: [单元文件名].[单元文件类型] vim redis.service [Unit] Description=Start redis on boot. After=default.target network.target [Service] User=redis Group=redis Type=forking PIDFile=/alidata/server/redis/log/redis.pid ExecStart=/alidata/server/redis/bin/redis-server /alidata/server/redis/redis.conf ExecReload=/bin/kill -s HUP $MAINPID ExecStop=/bin/kill -s QUIT $MAINPID PrivateTmp=false #Restart=always [Install] WantedBy=multi-user.target # 修改文件权限为只有root用户可以编辑该文件 chown -R root:root /etc/systemd/system/redis.service chmod -R 644 /etc/systemd/system/redis.service # 更新systemd systemctl daemon-reload systemctl enable redis systemctl start redisredis加入系统服务cp /home/redis/redis-5.0.3/utils/redis_init_script /etc/init.d/redis # 编辑/etc/init.d/redis 直接用systemctl控制开启和关闭redis # start 部分修改 #$EXEC $CONF systemctl start redis # stop 部分修改 #PID=$(cat $PIDFILE) echo "Stopping ..." #$CLIEXEC -p $REDISPORT shutdown #while [ -x /proc/${PID} ] #do # echo "Waiting for Redis to shutdown ..." # sleep 1 #done systemctl stop redis#如果没有设置开机启动 执行chkconfig redis on配置环境变量vim /etc/profile PATH=/alidata/server/redis/bin:$PATH # 使配置生效 source /etc/profile六、php安装redis扩展安装igbinary和phpredis扩展如果phpize动态编译报错Cannot find autoconf yum install m4 yum install autoconf wget http://pecl.php.net/get/igbinary-2.0.7.tgz tar -zxvf igbinary-2.0.7.tgz cd igbinary-2.0.7 phpize ./configure make && make install wget https://github.com/nicolasff/phpredis/archive/4.0.2.tar.gz tar -zxvf 4.0.2.tar.gz cd 4.0.2 #用phpize生成configure配置文件 phpize ./configure --with-php-config=/alidata/server/php/bin/php-config make && make install配置php.ini在php.ini最后一行加上 extension_dir = '/【php安装路径】/lib/php/extensions/no-debug-non-zts-20160303/' extension=igbinary.so extension=redis.so 重启php-fpm和Nginx,完成。七、php扩展trie-filter安装libiconv这个是libdatrie的依赖项wget http://ftp.gnu.org/pub/gnu/libiconv/libiconv-1.15.tar.gz tar zxvf libiconv-1.15.tar.gz cd libiconv-1.15 ./configure make make install //查看版本 iconv --version 如果报 iconv: error while loading shared libraries: libiconv.so.2 ldconfig安装libdatrie最新版本下载站点https://github.com/tlwg/libdatrie/releaseswget https://github.com/tlwg/libdatrie/releases/download/v0.2.12/libdatrie-0.2.12.tar.xz tar xvJf libdatrie-0.2.12.tar.xz cd libdatrie-0.2.12 ./configure --prefix=/usr/local/libdatrie LDFLAGS=-L/usr/local/lib LIBS=-liconv make make install安装trie-filter扩展git clone https://github.com/zzjin/php-ext-trie-filter cd php-ext-trie-filter phpize ./configure --with-php-config=/alidata/server/php/bin/php-config --with-trie_filter=/usr/local/libdatrie make make install在php.ini文件最后加上extension=trie_filter.so,保存配置并重启php八、php开启opcache1. 配置php.ini文件在php的安装目录配置php.ini文件添加opcache扩展extension_dir = '/alidata/server/php/lib/php/extensions/no-debug-non-zts-20160303/' zend_extension=opcache.so配置opcache[opcache] 1. 开关打开 opcache.enable=1 2. 开启CLI opcache.enable_cli=1 3. 可用内存, 酌情而定, 单位为:Mb opcache.memory_consumption=528 4. Zend Optimizer + 暂存池中字符串的占内存总量.(单位:MB) opcache.interned_strings_buffer=8 5. 对多缓存文件限制, 命中率不到 100% 的话, 可以试着提高这个值 opcache.max_accelerated_files=10000 6. Opcache 会在一定时间内去检查文件的修改时间, 这里设置检查的时间周期, 默认为 2, 定位为秒 注意:0是一直检查不是关闭,推荐 60 opcache.revalidate_freq=60 7. 打开快速关闭, 打开这个在PHP Request Shutdown的时候回收内存的速度会提高 opcache.fast_shutdown=1
-
-
常用正则表达式 ([\s\S]*?) 表示任意多个字符,换行也可以匹配 ([\s*]+) 匹配一个或多个空格 ([\s,]+) 匹配多个空格或逗号 ([,]+) 匹配多个逗号 /php/i 不区分大小写 ^ $ 匹配开始结束字符 . 匹配除换行以外字符串 ? 0次 或 1次 等价{0,1} * 0次 或 多次 等价{0,} + 1次 或 多次 等价{1,} - 表示范围 [] 开始结束字符类定义 \d 任意10进制数字 [0-9] \s 任意空白字符 单个 \S 任意非空白字符 \w 任意单词字符 等价[a-zA-Z0-9] (?:中国|美国)(.*) 匹配中国,美国开头的字符串 (\d+\.\d+\.\d+\.\d+) IP ([a-zA-Z][a-zA-Z0-9_]) 匹配是否合法字母开头 (\d-\d|\d-\d) 电话号码 [1-9][0-9] qq ^[\w\.\-]+@\w+([\.\-]\w+)*\.\w+$ email href="(.*?)" 超链接/^\d{1,6}$/ 匹配0-999999/\d{4}年\d{1,2}月\d{1,2}/ 匹配年月日preg_math 匹配一次,成功返回 truepreg_match("/\<center>([\s\S]*?)<\/center\>/",$str,$rs);preg_match_all匹配多次,成功返回truepreg_match_all("/\<center>([\s\S]*?)<\/center\>/",$str,$rs);preg_replace 匹配替换,替换成$re$rs =preg_replace("/\<center>([\s\S]*?)<\/center\>/",$re,$str);preg_split分割成数组$arr = preg_split('/([\s*]+)/',"a b c d ef");替换$str = "选项[http://127.0.0.1/weixin/addons/yoby_diyform/weui/fm.jpg]你好"; $str1 = preg_replace("/(?:\[)(.*?)(?:\])/i", "<img src=\"\${1}\" />", $str);preg_replace("/.*\|(.*?)\|.*/i", "\${1}", $v); 字符|120000|来了 输出120000\s+ 多个空白[^>] >左边任意字符.*? 任意多个字符\d+ 匹配数字/*获取html并用正则处理*/function get_content($url){ $html = file_get_contents($url); $code= mb_detect_encoding($html, array("GB2312","GBK",'UTF-8','BIG5'));//获取编码 if($code!="UTF-8"){ $htmls = mb_convert_encoding($html, "UTF-8", $code);//转换内容为UTF-8编码 }else{ $htmls = $html; } $htmls = preg_replace("/<script[\s\S]*?<\/script>/i","",$htmls,-1);//去除script $htmls = preg_replace("/<noscript[\s\S]*?<\/noscript>/i","",$htmls,-1);//去除noscript $htmls=preg_replace("/<(\/?link.*?)>/si","",$htmls);//去掉link $htmls=preg_replace("/<(style.*?)>(.*?)<(\/style.*?)>/si","",$htmls);//去掉style $htmls =preg_replace("/style=.+?['|\"]/i",'',$htmls,-1);//去除style行内样式 $htmls =preg_replace('#<!--[^\!\[]*?(?<!\/\/)-->#' , '' , $htmls);//去掉html注释 $htmls = preg_replace("/<a[^>]*>(.*?)<\/a>/is", "$1", $htmls);//去除外站超链接 $htmls = preg_replace("/(\n\r)/i", '', $htmls); //去掉空行 return $htmls;} preg_match('/<div class="infoBox-list".*?>.*?<div class="news-page clearfix">/ism', $htmls, $rs); $htmls = $rs[0];//获取两个class之间内容 $url = (preg_match('/^http(s)?:\\/\\/.+/',$url))?$url:"http://".$url;//判断是否包含https/httppreg_match("/src=\"\/?(.*?)\"/",$content,$match);第一张图片[\u4e00-\u9fa5]{0,} 匹配中文 \d+ 匹配>=0数字[a-zA-Z]+ 不区分大小写26个字母[A-Za-z0-9]+ 英文与数字 \s+ 多个空格[0-9]* 匹配一串数字 \d{4} 匹配四位数字 \d{5,} 匹配至少5位数 \d{4,10} 匹配4-10位数